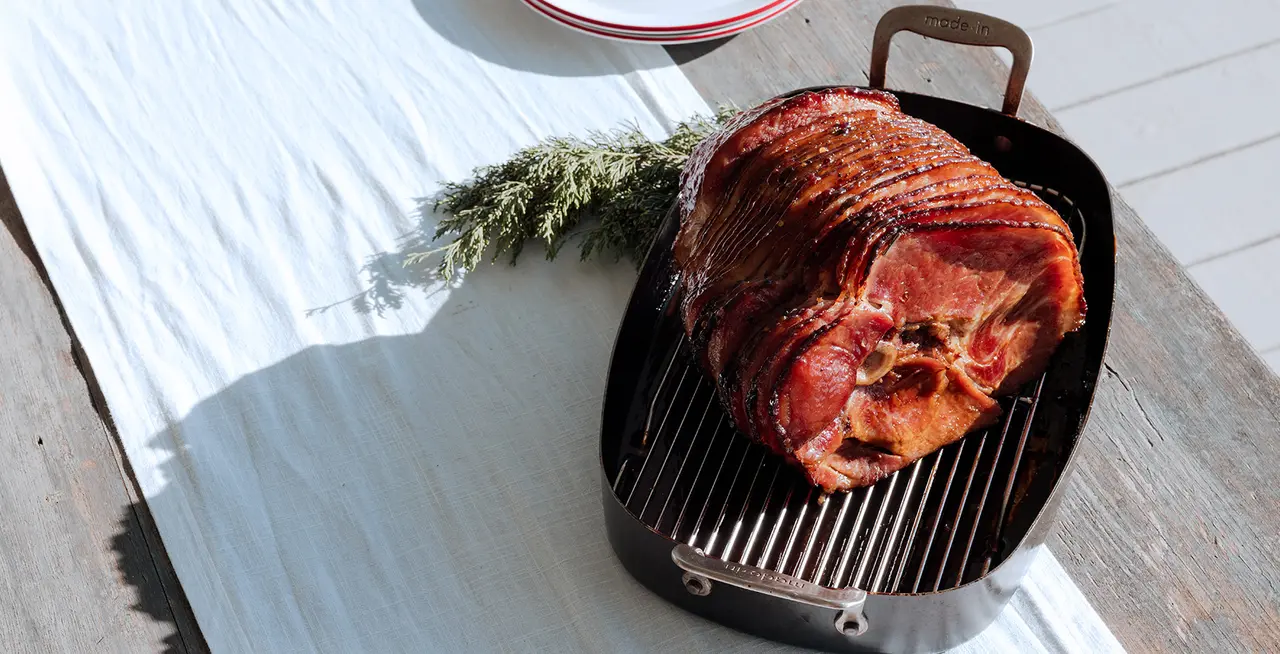
In the final months of the year, seasonal celebrations call for a large roast—the beloved centerpiece of many a holiday table.
Some prefer to outsource ham duty to a trusted guest or favorite restaurant. However, preparing and presenting a holiday ham doesn’t have to be a daunting task. In fact, with a few tools and some handy tricks, selecting, preparing, and roasting a holiday ham can be downright easy and leave you plenty of time to focus on the side dishes.
How to Shop for Ham
There are many options when it comes to ham buying, and your decision depends on how much work you want to do, whether you want to deal with bones, and how many mouths you’re feeding. Most hams available in supermarkets have been either cured or brined, and are sold fully cooked, either by smoking or baking. These hams are labeled "ready to serve" or "ready to eat." So “cooking” your ham is really more of a warming process.
Boneless hams are oval shaped and about a quarter of the size of a whole ham. They are easy to cut in large slices, which makes them perfect for sandwich-making. The downside is that boneless hams miss out on the flavor imparted from keeping the bones in place during cooking.
Bone-in hams require a little extra care and carving, but they’re generally larger and have more flavor.
Lastly, semi-boneless hams are another option. The hip and tailbones are removed, leaving only the thigh bone in place. Semi-boneless hams come in whole and half sizes.All of these ham options are available “spiral-cut”, with the meat sliced in a spiral formation. Spiral-cut hams make slicing and serving a breeze, especially the bone-in varieties. However, they run the risk of drying out in the warming process if not properly glazed.
It is possible to purchase a fresh ham (not cured, brined, smoked, or baked) from specialty purveyors if you’d like to try cooking a ham rather than warming it.
The last consideration for your ham is how many people you are feeding. It’s safe to plan for about ½ to ¾ pound per person for bone-in hams, and ⅓ to ½ pound per person for boneless.
How to Cook Ham
Once your holiday ham is ready to roast, follow these simple steps to take it from fridge to table.
Step 1: Gather Your Supplies
Get ready to cook your ham with a Roasting Pan and accompanying rack, aluminum foil to cover the ham as it cooks, a meat thermometer, and your accompanying glaze.
Step 2: Score the Skin
While scoring creates an elegant appearance, it’s actually quite easy to achieve. Using a sharp knife, start near the bottom of one end of the ham and cut all the way across the surface about ½-nch deep. Create parallel lines about one inch apart, then turn the ham about 45 degrees and repeat the process to create cuts diagonal to the original marks.
Not only does scoring your ham create an intricate pattern for a pleasing presentation, it has an effect on how the ham cooks. The skin of the ham is coated in thick layers of fat, and a properly scored ham will allow that fat to essentially baste the inner meat for a richer flavor and even moisture. Furthermore, when you add your glaze, it will soak deeper into your ham thanks to those score marks. Please note, this technique is recommended for hams that are not spiral cut.
Step 3: Bake
Depending on the size of your ham, bake for 45 minutes to an hour at 350F before applying glaze. This ensures your ham is properly heated before the glaze is applied and lets the outer layer of fat drip into the rest of the meat.
Step 4: Glaze
After your ham has baked, it’s time to apply the glaze. If you apply it any sooner, the outer skin and fat of the ham will remain soft rather than forming a pleasant crust. It’s also fine to wait to apply the glaze until the ham is completely cooked, if that fits better into your cooking schedule. Using a clean basting brush, coat the surface of the ham, taking care to evenly cover both the skin and the inner score marks.
If you glazed before continuing to bake, roast for another 10 or so minutes until the glaze has hardened. Apply more glaze, carve, and serve.
Additional Ham Cooking Tips
Now that you know the basics, here are some tips to take your holiday ham to the next level.
Let It Rest
Hours of work are wasted without a resting period for your finished ham. Letting the meat rest before carving allows the juices within the cut to settle and reabsorb into the ham. If you cut into it too soon, that liquid gold ends up on the cutting board while your ham ends up dry.
Use the Correct Tools
A few tools make all the difference for your holiday meal prep. While you may find disposable aluminum roasting pans in your local grocery store around the holidays, they aren’t the best option for roasting ham (or any other protein).
We recommend a Carbon Steel Roasting Pan, which can be used and reused for holiday or weeknight meals for years to come. Foil pans become heavy and hot during cooking, and without handles, you run the risk of your ham ending up on the floor instead of the table.
Another great tool to have at your disposal is a proper Carving Knife, which will ensure that you get the most meat off of your ham and that it comes off in clean slices.
Cook to the Right Temperature
The Made In Kitchen always uses an instant-read digital thermometer to ensure the ham has come to the proper internal temperature of 135F before serving. Insert into the middle of the ham, avoiding the bone if bone-in, to make sure it’s heated thoroughly.
Ready to Cook?
The holidays are right around the corner, so it’s time to start searching for that perfect centerpiece ham. Our Culinary Creative Director Rhoda Boone has you covered with her spiral-cut, Hot Honey-Glazed Ham recipe that comes together in just two hours, but tastes like it took all day.
