Have you ever baked a delicious custard pie only to cut into it and discover that dreaded soggy bottom? While likely still edible, it’s disappointing when a pie crust doesn’t bake into a browned, flaky vessel for whatever creamy filling lies inside. With a few simple steps, any baker can improve their crust-baking technique.
Baking a pastry crust is a real choose your own adventure. After rolling out your crust (store-bought or homemade), you have a decision to make: bake, or blind bake (also known as par-baking). The method you proceed with is dependent on the filling. The filling and crust of fruit pies are typically baked in unison, but baking the crust either partially or fully before filling is the often-forgotten first step for a custard- or cream-filled pie.
Read on to learn the importance of blind baking and how to perfect it.
Why Blind Bake Pie Crust?
The doneness of a crust can make or break a pie. It provides necessary crunch and chewiness to offset a soft filling, and without a well-done crust, you could wind up with something more like a fruit cobbler, a frittata, a doughy pudding, or just a mess.
Enter blind baking. Blind baking ensures that a crust reaches an acceptable point of doneness prior to adding filling. By giving the empty crust some oven time, you’re allowing it a head start over the filling, which will bake at a quicker rate.
You’re also reducing the likelihood that your crust soaks up extra liquid from the filling as it bakes. Unless you’re using a glass pan, it’s nearly impossible to figure out if your bottom crust is completely baked with the filling in it, so blind baking adds a level of control for the baker.
Depending on what you’re using it for, you can either blind bake a little or a lot. For instance, recipes that involve an uncooked filling—such as ice cream pie, pudding-based pies like banana cream, or fresh fruit tarts—should be completely blind baked since the crust won’t see the oven after it's filled.
On the other hand, eggy quiches or pies with custard fillings like pumpkin pie that need to be baked in the oven, should be blind baked for only a few minutes so it can finish baking with the filling.
How to Blind Bake a Pie Crust
To perfectly blind bake a crust, there are three simple rules: work with very cold dough, weigh your pie crust down, and (despite the method’s name) keep a close eye on the oven during the bake.
Store-Bought CrustThere is no shame in using a store-bought crust, and it’s a quick fix for a delicious finished product— especially if you blind-bake it to produce a perfectly-cooked crust that will rival even the best homemade one.
Step 1: Thaw the Crust
Pie crusts are sold frozen or refrigerated to maintain freshness. If your crust came from the freezer, check the package instructions, but generally plan to let it sit on the counter for 60 to 90 minutes to thaw. If it was refrigerated, give it 15 minutes at room temperature to thaw before unrolling.
Step 2: Choose the Right Pan
Store-bought crusts will indicate on their boxes what size of Pie Dish or pan you should use, usually 9- or 10-inches. Don’t attempt to roll the dough out to fit into a larger dish—as it blind bakes, the crust will shrink. An over-rolled crust risks tearing or dipping below the pan lip.
Step 3: Prep the Crust for the Oven
Carefully unroll the crust into the dish. Gently press the dough into the corners of the pan, and create a crimp (or whatever pattern you like best) around the lip of the dish. Use a fork to poke small holes in the bottom of the crust—this will minimize big air pockets. Cover the dish with plastic wrap, and let it rest in the fridge or freezer while you wait for the oven to preheat to the temperature specified on the box.
Step 4: Add Weight
Right before baking, remove the dish from the fridge or freezer and place it on a Sheet Pan to catch drippings in the oven. Cut a piece of parchment paper or tin foil slightly larger than your pie, and press it firmly into the crust, making sure to leave no space. Add your preferred pie weight (more on that below) all the way up to the pie crimps.
Step 5: Time to Bake
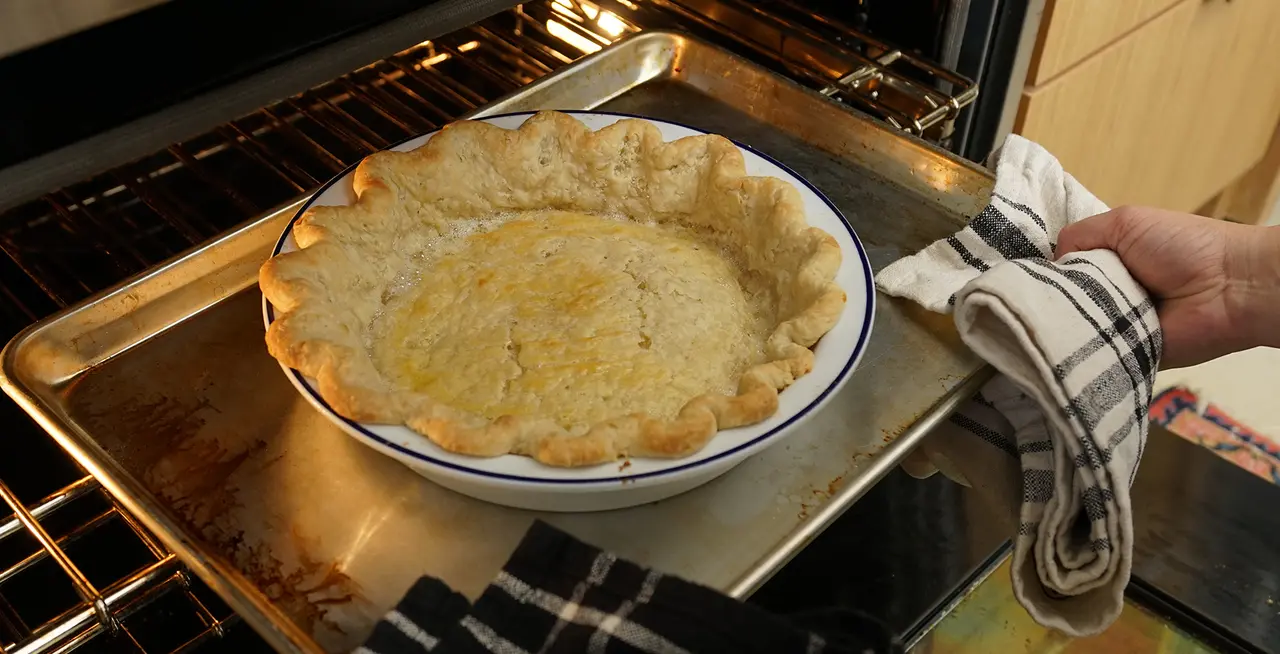
Place the Sheet Pan and the weighted crust on the center rack of your oven. Bake for 15-20 minutes, until the pie edges look set and slightly golden but not brown. Remove the crust from the oven, and carefully remove the pie weights and paper or foil, then return it to the oven. Note that bake times may vary based on the crust brand, so follow any special instructions on the store-bought crust’s box.
Homemade CrustThere is nothing better than a homemade pie crust, except maybe a perfectly-baked homemade crust. Here’s how to blind bake your crust perfectly so your crust efforts can be thoroughly appreciated.
Step 1: Roll Out the Pie Dough
After making and chilling your pastry dough, roll it out with a Rolling Pin on a clean, lightly floured surface to an even thickness (⅛- to ¼-inch) and about an inch wider than your Pie Dish on all sides. If your dough starts to get sticky during this process, don’t panic—just pop it in the fridge for a few minutes to solidify the butter, lard, or shortening, then proceed.
Step 2: Prep the Crust for the Oven
Carefully place the crust into your Pie Dish either with two hands, or by rolling and then unrolling it from a Rolling Pin. Gently press the dough into the corners of the dish , and create a crimp (or whatever pattern you like best) around the lip of the dish.. Use a fork to poke holes in the bottom of the crust—like with a store bought crust, this will help to minimize big air pockets. Cover the pan with plastic wrap, and let it rest in the fridge or freezer while you wait for the oven to preheat to 425℉.
Step 3: Add Weight
Right before baking, remove the dish from the fridge or freezer and place it on a Sheet Pan to catch drippings in the oven. Cut a piece of parchment paper or tin foil slightly larger than your pie, and press it firmly into the crust, making sure to leave no space. Add your preferred pie weight all the way up to the pie crimps.
Step 4: Time to Bake
Place the Sheet Pan and the weighted crust on the center rack of your oven. Bake for 15-20 minutes, until the pie edges look set and slightly golden but not brown. Remove the crust from the oven, and carefully remove the pie weights and paper or foil, then return it to the oven. Cook until desired level of doneness is reached.
How to Use Pie Weights
When you bake a filled pie, the filling weighs down the crust and holds it in place along the sides of your baking dish. It’s important to replicate that weight when blind baking an empty pie shell to avoid a shrunken pie crust. There are several ways bakers do this, and it’s a matter of testing different weights to find the one that works best for you.
There are store-bought pie weights, which were created with the sole purpose of weighing down your pie. They are usually beads made of ceramic or stainless steel. Beaded pie weights are easy to remove from the pie shell after baking, but they can be an expensive investment with one purpose.
Some bakers use dried beans as pie weights. This economical option allows you to reuse the beans over and over, and will give your kitchen a nutty smell while baking. It doesn’t matter which type of dried beans you use—however, the bigger the bean, the less likely you’ll fill all the tiny crevices of the pie shell and crimps, which is crucial to keeping it from slipping down the pan’s lip.
Another option is sugar. It won’t melt while baking and it guarantees that you’ll fill all the nooks and crannies of the crust with weight. Bonus points for sugar: while you can reuse it for more blind baking, you can also repurpose the toasted ingredient to add a caramelized flavor to any recipe that calls for sugar.
Blind Baking Tips
The sign of a good baker is the ability to troubleshoot issues that come up during a bake. Here are some pro tips to give you a head start when blind baking.
- Keep an oven-safe thermometer in your oven. It’s crucial that the cold crust hits a perfectly-heated oven, or it will leak butter or shortening, resulting in a dry crust and a sticky oven. Many ovens don’t accurately display their temperature, especially if they are older models.
- If you’re using a metal, tin, ceramic, or porcelain Pie Dish, let it chill in the freezer. Do not put glass or Pyrex pie dishes in the freezer, as they are prone to shattering with large temperature changes.
- If at any time during your bake the crust’s edge begins to look too brown but the bottom isn’t finished cooking, remove it from the oven and cover just the edge with tin foil or a pie crust shield. Pop it back in to finish the bake.
- If you want to egg wash your crust edge,which adds nice shine and browning,brush the egg wash on after the first 15-20 minutes in the oven for a blind bake.
Ready to Cook?
Now that you have all the tips and tricks to perfect pie crust blind baking, it’s time to put your skills to the test. Our hand-crafted porcelain Pie Dish is great for baking beginners and novices alike. With a simple, nostalgic design featuring a flat edge and an extra-deep base, it’s a versatile dish to showcase your favorite crust designs and plenty of delicious filling.
